Monday, 15 March 2010

Experimental Animation

The idea of this topic is to try out different animating techniques. We have decided to use two different mediums, for the first half of our animation we will be animating it as stopmotion and the second half will be pixilation.
We have decided to do this to differentiate between reality and what our character is imagining, an added twist is to have reality represented with stopmotion and his imagination represented with pixilation.

Planning

The basic jest of the story is that our character has no money and is trying to figure out a way of getting some. The group split into two and we each took a different medium, I worked on the pixilation half, this was depicting our character thinking of different ways of obtaining money. He comes up with a couple ideas and thinks them through, first he thinks about robbing a bank but then considers the consequences and decides this isn’t such a good idea, he then comes up with the idea of growing a money tree and sees himself rolling in money once the tree has grown.

Working progress


I really enjoyed working in pixilation I found it to be very enjoyable and fairly quick to capture compared with other animation techniques; I did find it was harder to keep the image consistent though due to the fact that I didn’t realise I had moved between shots, when you watch the animation our expressions change and I’m looking in different directions in the pictures.

Final Animation

money. from Richard Whillock on Vimeo.


Evaluation

I like the aesthetic quality of the animation and the combination of both techniques. The only issue I have with the animation is that the plot is a bit fractured and isn’t very clear, From an audience’s point of view the story needs some explaining before it becomes clear what’s going on. As we came up with the idea we didn’t realise this until we had played the video to an audience and got their feedback. In the future I will run my ideas past someone who doesn’t know the plot and see if they can make sense of what’s going on befor I start animating to avoid this problem.

Stop Moation Walk Cycle

Stop Motions Walk Cycle

This is the first stop motion animation I ever made, and I am looking forward to animating!

The aim of this animation is to in groups demonstrate a simple walk cycle using a stickfas model.
The preparation of this animation was making the model to animate, setting up the lighting and camera and finding a way to attach the model to the set. Using Richard Williams’ the animators survival kit page 108 as a reference for our walk cycle we got to work animating, instead of taking a picture then moving the model then taking another picture etc etc, we had a walk cycle set out with the models we had between us, although we could only make half a walk cycle at a time we used the models not being photographed at the time to make the next pose.


Final Animation


Having fun with animation


As the Walk cycle didn’t take long to animate I started to mess around with the model making it brake dance then another member of the group thought to take pictures which we then turned into another animation which turned out to be a beneficial learning curve for us all.
During the dance I wanted the character to launce himself of his back onto his feet but as we got to this point in the animation we realised there was no way to suspend the model in the air without the supporting hand or rig being in the picture and therefore in the final animation, so as a group we had a quick brain storm and decided to try and suspend the model in the air with a hair we plucked from one of the group. This worked a treat, as the hair was thin enough not to be visible in the picture. The only problem we had with this method was keeping the suspended model still to get a clear picture.

This shows that messing around and having fun with stop motion animation is nothing but good, the sillier and more extravagant you try to make your animation the more problems you will come up against some may be more obvious than you might think but by finding these problems when its your own time is much better than when you have a deadline.

Brakedancing animation


Once we got started messing around with the models it was hard to stop. This next animation was made by a group of us wasting time until we could go home! We decided to create an epic battle between our hero and a gang of zombies. We each had our own model which we were in charge of animating which meant it didn’t take long to make, this was purely for fun but I like the final outcome.


Tuesday, 12 January 2010

Audio Animation

Lip Syncing

This animation will be my first attempt at lip-syncing. We have been given a selection of audio clips to choose from which we then have to animate.
Before I start lip-syncing I need to study how our mouths move to create the sounds of words, is the word plosive? Has it got a strong vowel sound? Where is the tongue? Can we see the teeth? There is so much more to talking than simply opening and closing our mouths, without studying this there is no way my lip-syncing will be convincing enough to make my character appear to talk.

After doing a bit of research on google I found this template after searching lip-syncing animation in google images. This is a pretty useful template for this topic.
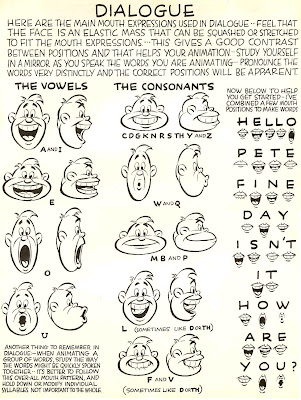


There is also a good lip-sync reference in Richard Williams the animator’s survival kit page 304 - 309, If you go back to page 70 - 77 there is a useful section on dope sheets, which I found of particular help during this project, as it was the first time I even heard of a dope sheet I had no idea what they were or how they worked, but more on that later...


After studying the reference above I started to plan out my own lip-sync template specifically for my piece of audio. I started by writing down the content of the audio clip.
“I’m not sure what we’ve got here Charlie, but if we’ve got what I think we’ve got, we got something.”
Then using the reference above I planned out the lip movements.


Next I had to start thinking about character and narrative. The piece of audio I chose sounded as though it has come from a crime drama or something along similar lines suggesting it was originally spoken by some sort of law enforcer, to put a comic spin on it I decided my characters should be as far from the image the audio portrays as possible, therefore I have decided my characters will be snails talking about a slug. I then thought about what snails do and all I could come up with was eat peoples plants and vegetables so I thought maybe id turn this on itself as well and have the slug eating their fruit. One of the other ideas I had was to show the snails looking at another snail that has been dehydrated to death with salt, to tie in the investigation aspect of the audio clip, but decided this was a bit morbid and I liked the idea of the snails being annoyed by the same reason they are despised by us.

My Story board


Dope sheets


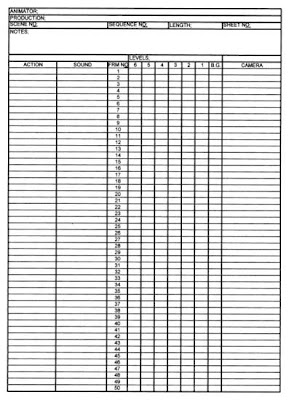
What is a dope sheet? Animators use dope sheets to sync the picture and audio. It is made up of several different sections; On the template above, each horizontal line represents one frame and is marked out in groups of 24 frames making up one second of footage. The ‘classic’ dope sheet or x sheet is designed to hold 4 seconds of action. The first vertical column shows the action, the second shows the dialogue and the next 5 columns show 5 cell levels of animation available if needed followed by the background column. The final column shows the camera direction, as confusing as it looks dope sheets can make keeping time much easier, it may be tedious to plan out every frame but once its done you know if you follow the sheet the animation process and animation will run smoothly!

Saying this Getting the hang of dope sheets takes some practice, as I found out when filling my own in. I understand how dope sheets work but without a brake down of the audio clip I found it extremely difficult to figure out on which line each word would fall, as I have no software to edit sound I was trying to brake the audio clip into beats by simply playing it on itunes and trying to pause the sound clip after each word and ended up having to guess where to put each word on the dope sheet, I was able to see which second I was in but had no idea what frame I was on. If you look at my own dope sheets below you can see they are empty of directions due to the lack of knowledge using them as well as the issue of braking down the sound clip.


Using my poor dope sheets as a guide I combined the action, lip-sync and audio to produce my final animation.

Final Animation


Evaluation

As you can see the lip-syncing didn’t go as well as hoped this is not only down to being unable to properly breakdown the audio but I made a silly mistake and forgot to adjust the frame rate so the animation ran on a lot longer than the audio, I did attempt to fix this problem but I defiantly need more practice with lip-syncing. I will be attempting to create another animation focusing on lip-syncing to give myself a bit more practice and hopefully develop these skills. Other than that I was happy with the outcome of the animation the visual is fairly smooth and the action runs at a normal steady rate which I am happy about.

Tuesday, 8 December 2009

Putting it all together

This is my first assessed animation, in other words the first one that counts!

The aim of this assessment is to put together everything I have learnt so far, and demonstrate all the principles of 2D animation in action.

Background Research


One of the current animators that inspire me is Simon Tofield creator of ‘Simon’s cat’. After seeing his animations capture the personality and behaviours of the cat so perfectly I’m determined to create something as enjoyable to watch as I find his shorts.


With this in mind I am starting the planning process of my animation.

Initial character Ideas

· Stick man – Already used
· Ball – Already used
· Animal – Potential
o Pets
o Sea life
o Birds – Already used
o Mammals
· Sports - Potential
o Running – Already used
o Swimming
o Jumping – Already used
o Cycling

I have decided to base the animation on one of my pets as this gives me a chance to study the movements of a real example of my character providing background research.
I am basing my character on my hamster Pippin.


The next stage

Character designs

This first drawing is too long.


The second is better but needs a few tweaks.


I am happy with my final drawing.

My story plan

To demonstrate all the principles of 2D animation I need to have quite a bit of movement and as my character is a hamster the animation will be set in the cage now I need to decide what is going to happen…

Narrative ideas

o Have the hamster running in a wheel
o Hamster climbs the bars
o Running through pipes
o ‘Sneaking’ food

Pros and cons

Wheel idea – I like this idea but it could get a bit dull to watch.
Bar idea – Would be easy to show the principles but the other ideas have more potential.
Pipe idea – wouldn’t really demonstrate the principles very well.
Food idea – Would show the principles of animation easily enough but needs more development.

I have decided to go with the food idea and am developing this idea further.

Idea development.
Instead of just running around eating food my character will ‘ninja’ around the cage appearing and disappearing whilst taking food from the bowl. This idea means I can show all the principles of 2D animation easily.


My Final Animation


Evaluation
I feel the idea had potential but the finished animation didn’t work as well as I would have liked.
The timing and spacing needs improvement but the stretching and squashing was demonstrated well I feel.
I’m not happy with this animation because it is a bit difficult to make out what is happening as the action moves too quickly and it would have been better if I zoomed in a bit. In the future I need to plan out my shots to ensure this doesn’t happen again!

Thursday, 3 December 2009

Stick Man

This topic is looking at Stretch and Squash in greater detail.

The aim is to demonstrate how a character will move in terms of stretching and squashing this will apply to nearly all animation as most characters are organic and therefore will have to include some degree of stretching and squashing or they will look unnatural or wrong.

For my character I am going to use a traditional stick man as this is easy to draw and will be sufficient in demonstrating this principle. After deciding on my character I need to decide what he is going to do to show the principle in action.
My initial idea was to have him running across the screen but this is far to simple and wont show much stretching or squashing, I could exaggerate the movement to display it but after a little thought I have decided to have my stick man jump an obstacle.

Possible ideas
· Jumps over a box
· Jumps a river
· Jumps another character
· Jumps over a fire
· Jumps a crocodile

I like the Crocodile idea best as this means I can animate the crocodile as well making the animation a bit more interesting.

My working progress


Final Animation


Evaluation

I am pleased with the finished animation I feel it demonstrates stretching and squashing well, it has been enjoyable to animate and I am happy with the outcome.
Timing and spacing needs some work to help it run a bit smoother but overall I feel it is a success.

Bouncing ball

This topic is demonstrating another two principles of animation, timing and spacing and stretch and squash.

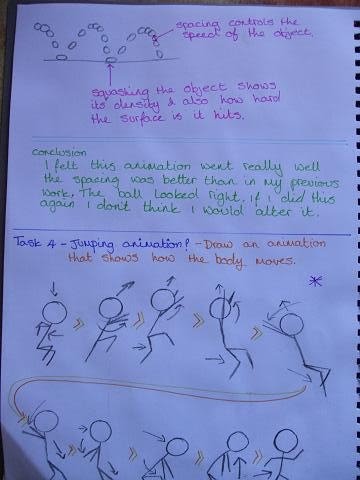
Timing and spacing is vital in animation to keep the animation running smoothly! Timing is literally the length of time something has happened and the spacing determines the speed it has happened.

Here is an example from Richard Williams’ ‘the animator’s survival kit’.


Stretch and squash demonstrates the characteristics of the ball, if it’s a particularly soft ball it will stretch and squash a lot where as if it was a ridged ball it wouldn’t, with this is mind I have decided that my ball will be fairly soft to help demonstrate this principle better.
To make my animation a bit more interesting I am including several obstacles for my ball to interact with, this will also enable me to change the speed of my ball clearly demonstrating timing and spacing as shown below.


My working Progress


I found this topic to be very beneficial, as it has helped me understand the most important aspects of animating. I have really enjoyed making this particular animation as the outcome has been so rewarding and this is most defiantly my best animation as of yet.

Final Animation

Thursday, 26 November 2009

Exaggerated emotions

In this Topic we are looking at exaggerated actions and emotions.

As humans we rely on body language a huge amount without even realising it, for example it would be very confusing if you were saying how angry you are while grinning, or if you were explaining how happy you are with a grumpy expression across your face, this would probably be seen as sarcastic. Generally we can tell if a person is happy or sad just by looking at their expression and stance, but in animation the characters can’t convey their emotion without the help of an animator and from an animators point of view it is not very easy to show any kind of emotion without exaggeration.

The aim of this topic is to demonstrate three exaggerated emotions and to demonstrate one of the principles of animation, morphing.

My first attempt at this went horribly wrong as I misunderstood what was meant by exaggerated emotion, I interpreted this as extreme emotion i.e. hysterics, crying or anger.
There fore there was no exaggeration in my animation although I did show morphing but it is very difficult to see, therefore I am going to make another animation clearly showing exaggerated emotion and more obvious morphing.

Here is my First attempt working progress.


First attempt final Animation


Evaluation

This animation in my opinion is terrible, it doesn’t demonstrate morphing at all well, the quality of drawing leaves a lot to be desired and there is absolutely no exaggerated emotion. This animation is a complete fail and I WILL be doing it again!